Skip to content
CogniAgent
  • Features
    Platform CapabilitiesCognitive AI AgentsConversational AIAutonomous AI Agents
    Virtual EmployeesMulti-Agent CollaborationAdvanced Voice AIWorkflow Automation
    All Features
  • Industries
    Retail & eCommerceReal EstateInsurance
    Call CenterRestaurantsSecurity
    Home Services
    HVACCleaning
    PlumbingAuto Repair
    All Industries
  • Use Cases
    SalesLead QualificationAI Sales Assistant
    Customer SupportCustomer Service AI AgentReturns Management
    MarketingAI Marketing AgentEmail Marketing Automation
    HR & RecruitingAI Recruiting AgentCandidate Screening
    OperationsERP Automation
    All Use Cases
  • Resources
    NewsBlogDocumentationPricing
    How-to GuidesTips & TricksPlatform Comparison
  • Company
    About UsContact
Start Free Demo
Guides / How to Create an AI-Automated Property Inquiry Auto-Response with CogniAgent


How to Create an AI-Automated Property Inquiry Auto-Response with CogniAgent

CogniAgent Email Follow-Ups Lead Validation No-Code Workflow Real Estate Automation
Jan 21, 2026
6 min read
Sofiia Kondrat
img bg 3

Discover how to build AI-automated email follow-ups that trigger the moment a client submits a property inquiry form – without manual email segmentation or repetitive follow-ups.

Most real estate teams waste hours every week manually sorting inquiry forms, copying client details into email templates, and setting reminders to follow up. Miss a follow-up window, and you’ve lost a potential sale. With CogniAgent, all of this happens automatically with a single workflow – no more copying and pasting, no more missed leads, no more paying staff to do repetitive admin work. Let’s start building!
Screen 1

What you’ll build in this guide

  • Complexity: Beginner → Intermediate
  • Total steps: 6 core steps (+ 1 optional review step)
  • Time to set up: ~20–30 minutes
  • Code required: None

By the end of this guide, you’ll have an AI-powered workflow that:
  • Instantly responds to property inquiries
  • Validates user input automatically
  • Sends personalized emails based on submission quality
  • Reduces manual follow-ups and errors

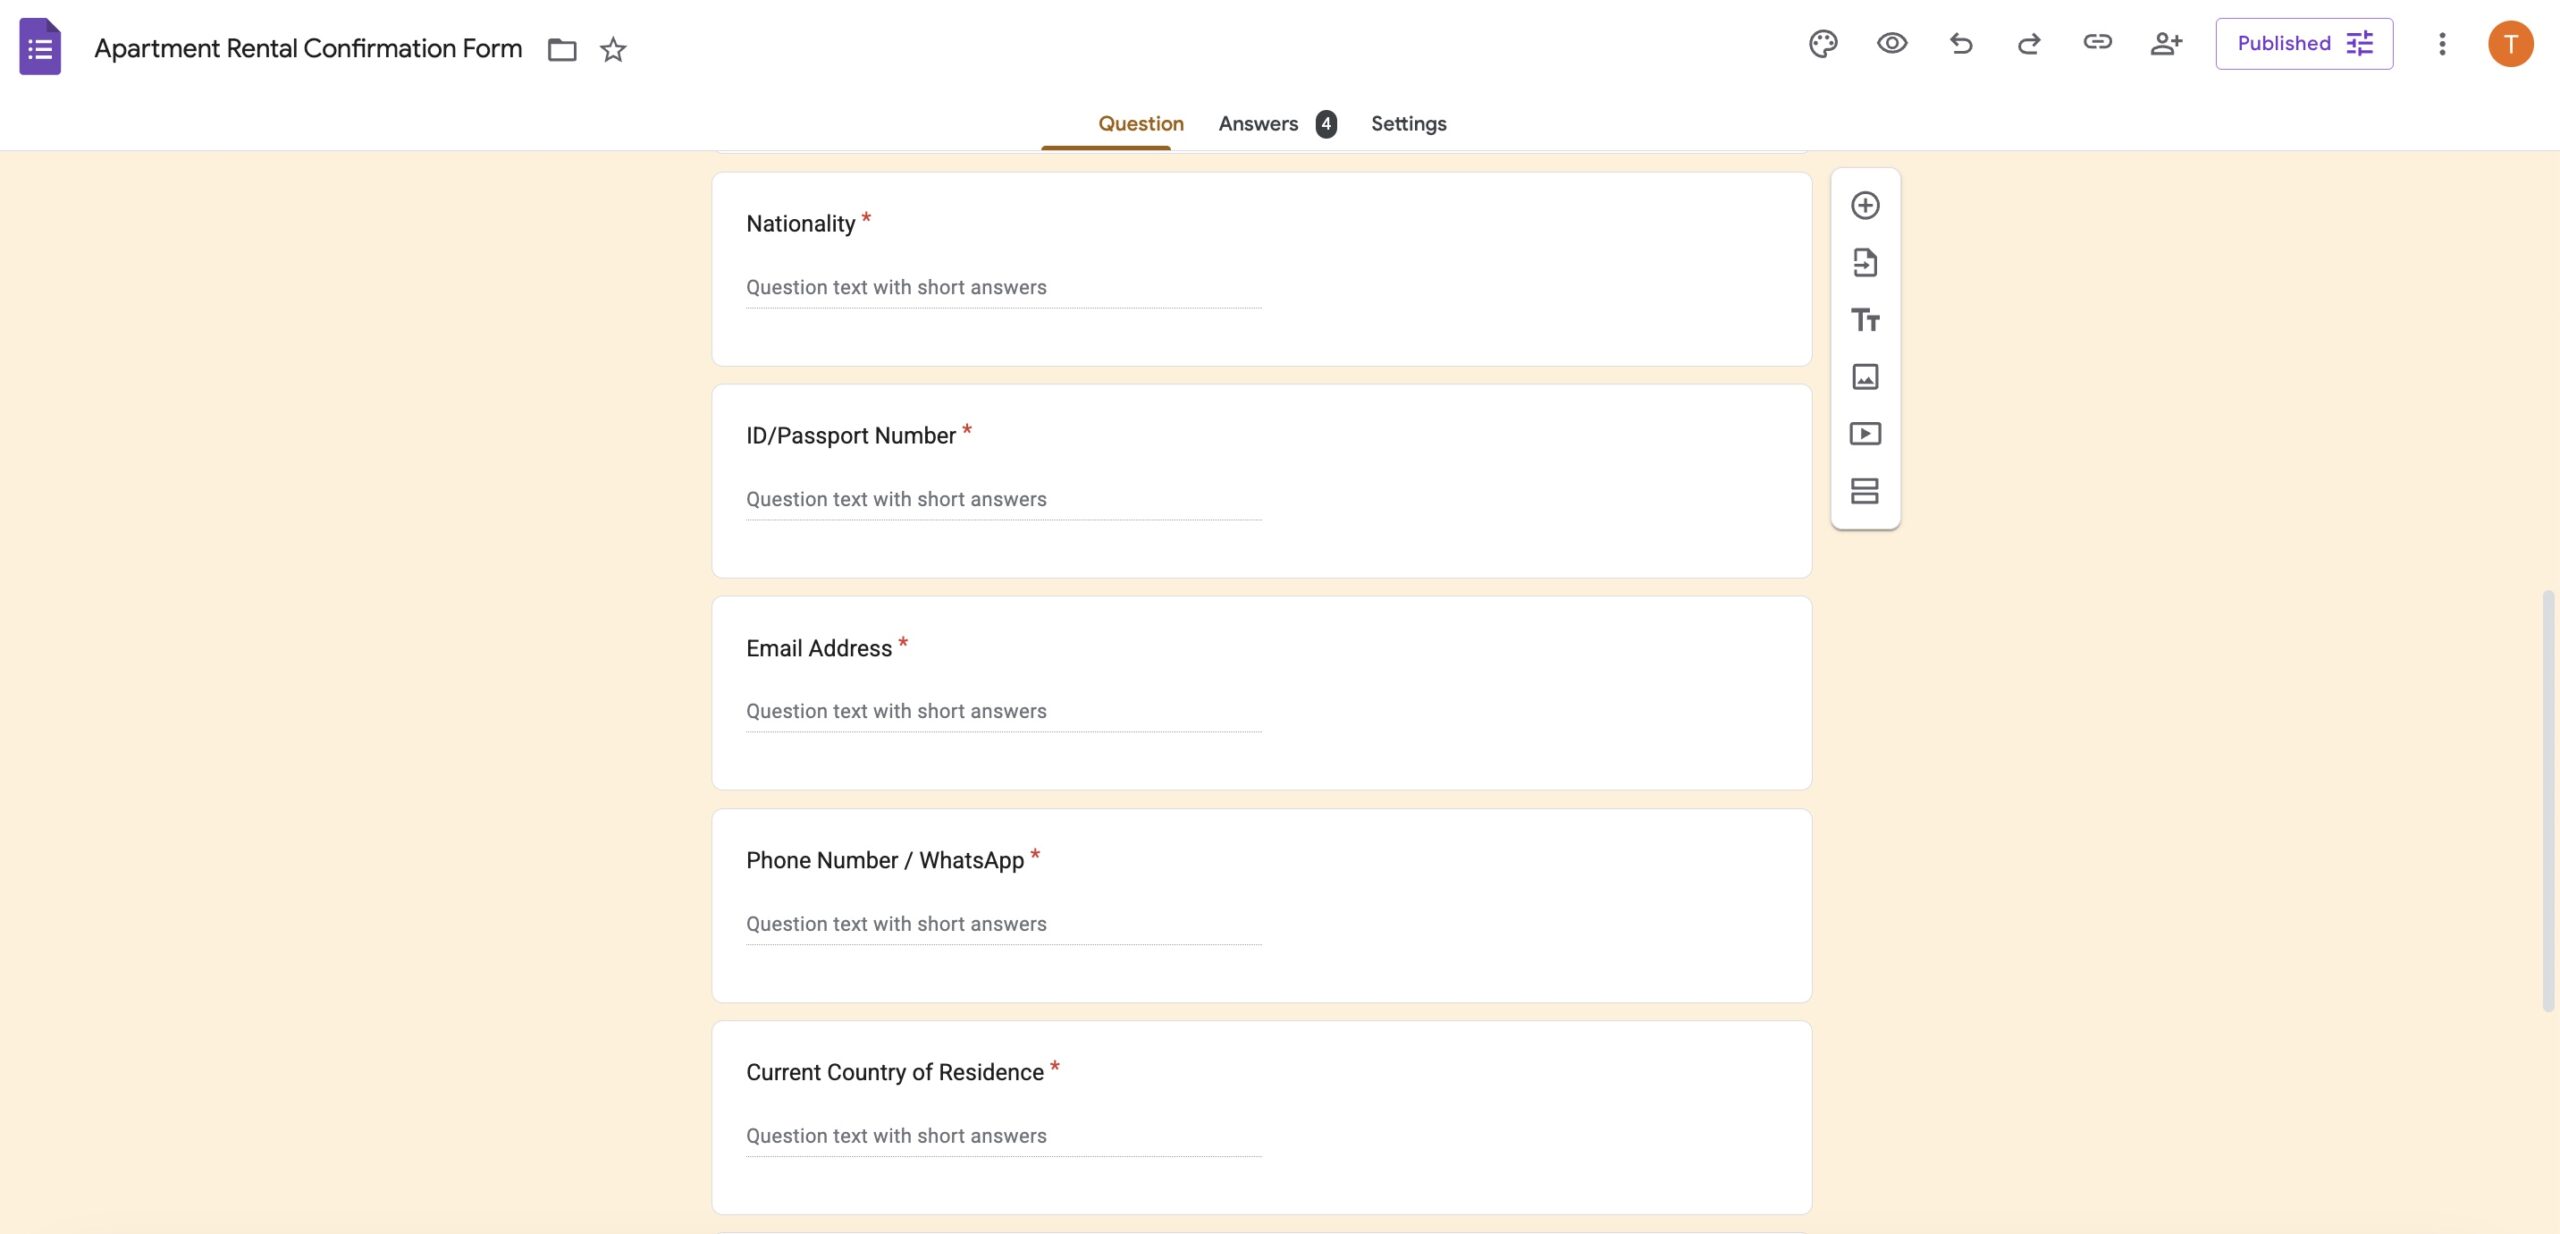
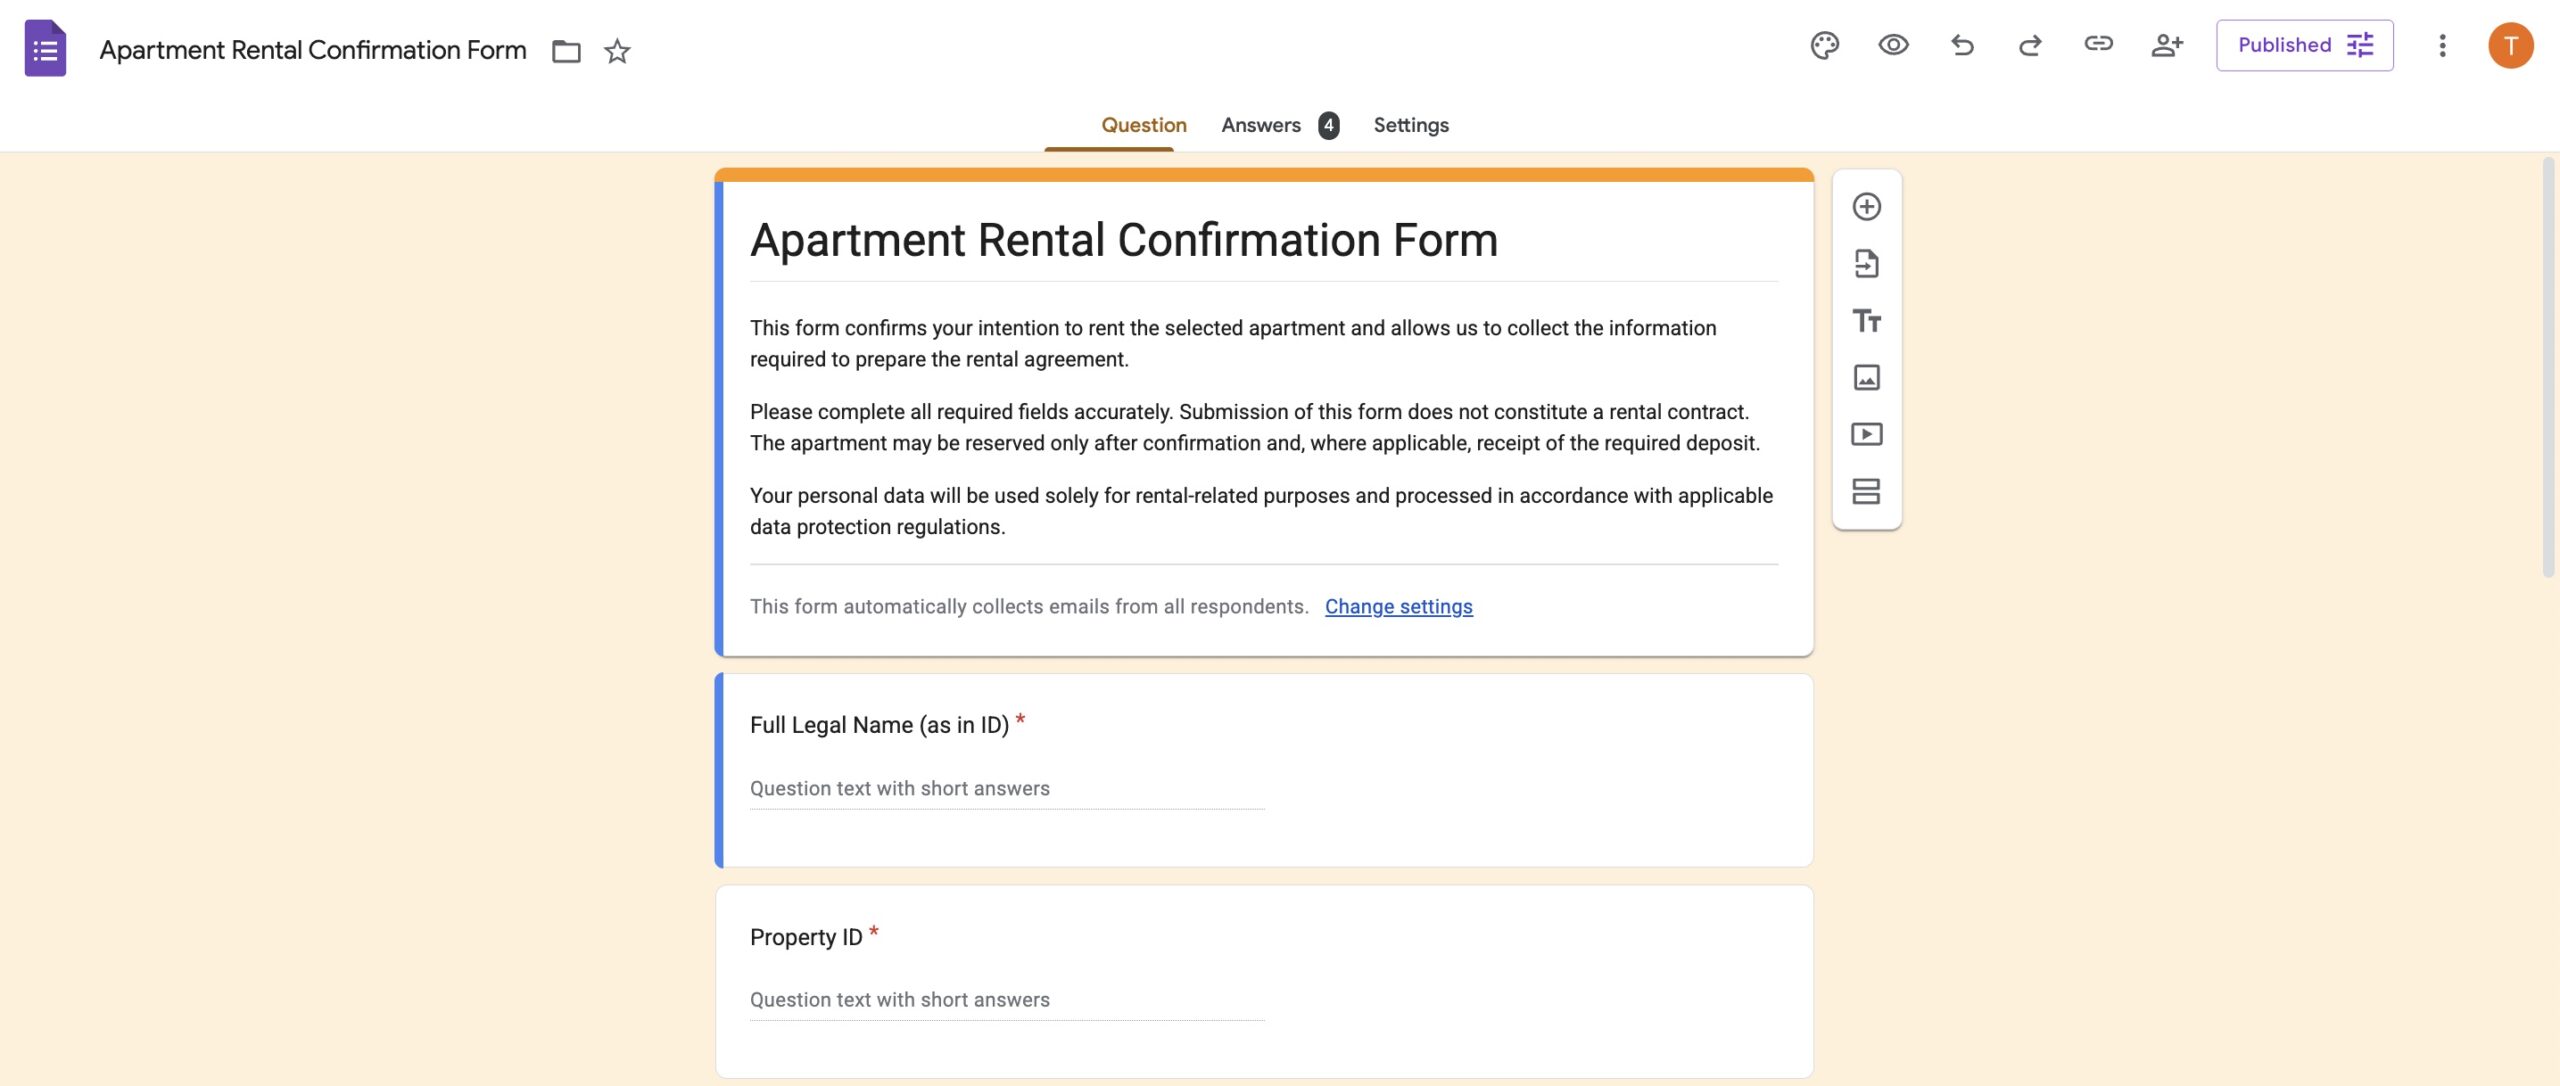
Here is an example of the inquiry form you may be working with:

274C2A1F 8B1C 48B2 976E 823F4BC98AA7

How to Create an AI-Automated Property Inquiry Auto-Response with CogniAgent
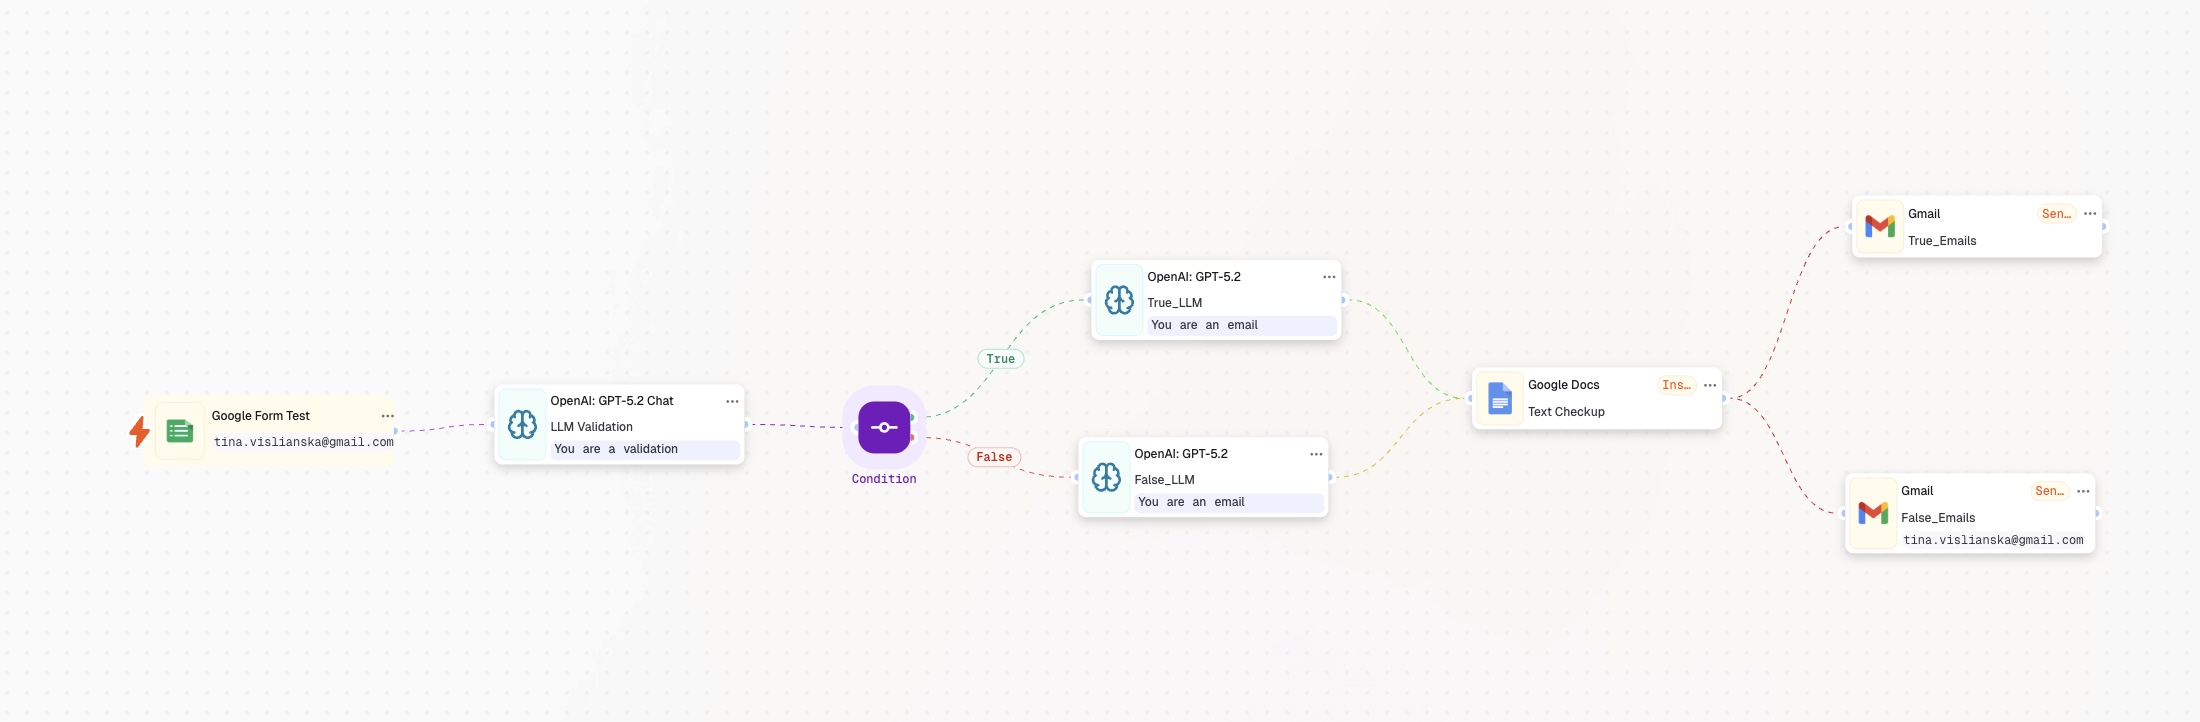
Here’s what your automated workflow will look like in action (customize it to fit your exact needs):
How to Create an AI-Automated Property Inquiry Auto-Response with CogniAgent

Why Does it Matter?

Property inquiries are time-sensitive. The faster and more relevant your response is, the higher the chance of conversion. Automating this step ensures that every lead receives an instant, personalized reply with the correct apartment details – without manual work. You save time, avoid errors, and convert more inquiries into viewings and bookings.

Step 1: Set the trigger node – Event from App

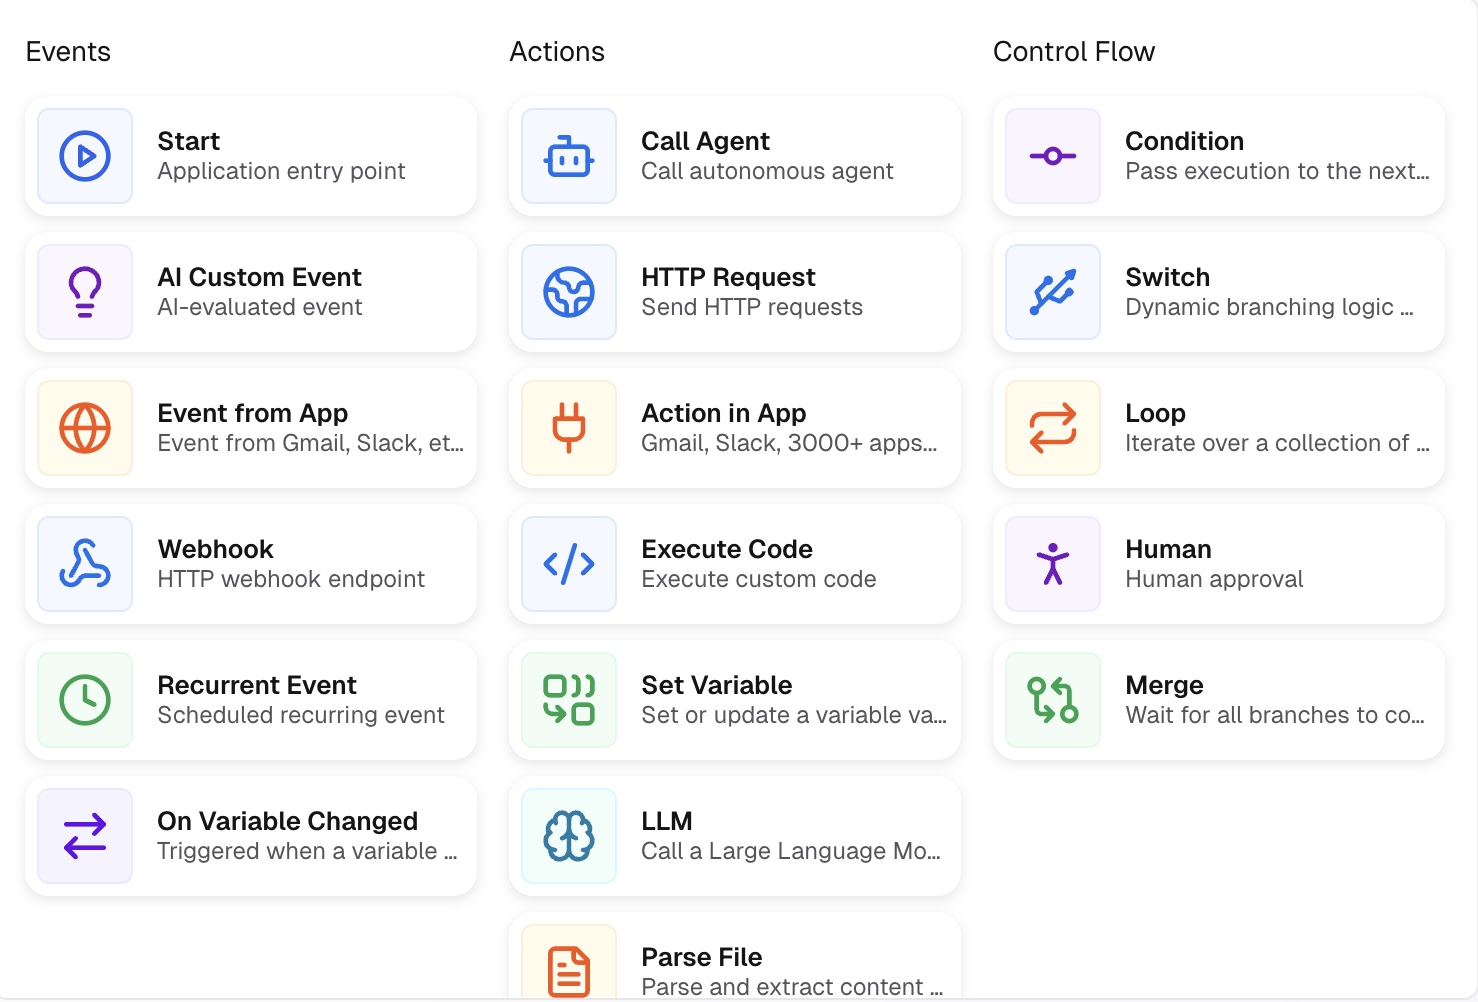
After opening the CogniAgent dashboard, click the “Add Step” button and choose “Event from App.”

As a quick refresher, CogniAgent is an event-driven platform. This means every action in your workflow starts from an event – such as a form submission, a data update, or an external trigger. In this case, the event is a user submitting a Google Form.
3C2652AA 9062 4587 818E 52FD2D123E71

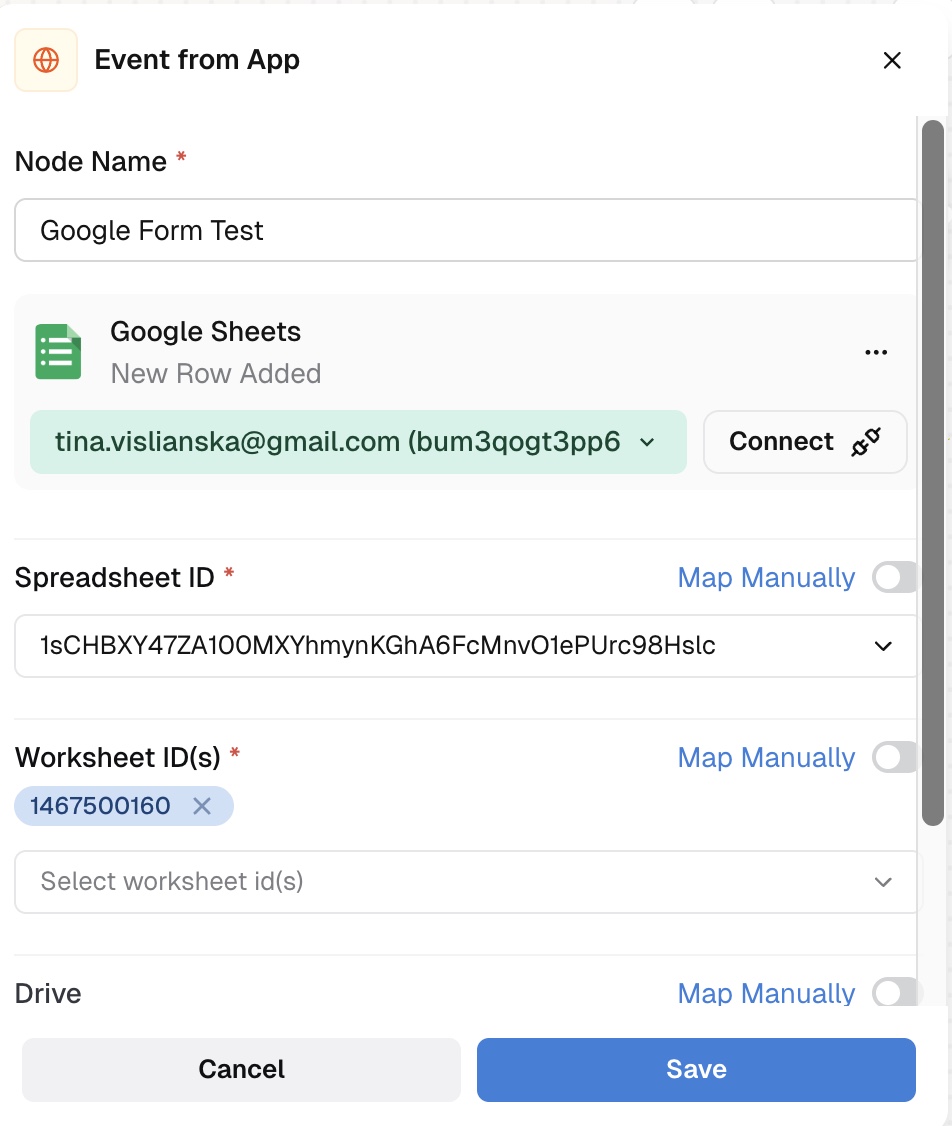
Once you select the node, open it and connect your Google account. The form that users will submit must belong to the same Google account you are connecting.

After connecting your account, enter the Form ID.

The Form ID is the part of the URL that appears after /d/e/ and before /viewform. Copy this value and paste it into the required field.

Alternative option: Convert your Google Form responses into Google Sheets and use the sheet as the starting node. In some cases, this works better due to Google-specific limitations and behavior.
0DC4DA43 659F 4BD0 8BBB 49EBC340E2E1

Step 2: Set the action node – LLM (Validation)

Next, you’ll define what happens after the form is submitted. The first logical action is to validate the submission – checking whether the user provided complete and correct information.

This step prevents your workflow from sending emails to invalid or empty email addresses.

To do this, add an LLM node from the Action set and name it clearly (for example, LLM Validation). Keeping node names clean and descriptive is important for maintaining complex workflows.

Choose a text-based model. For this use case, you can select GPT-5.2 Chat.

This node has two key instruction fields:
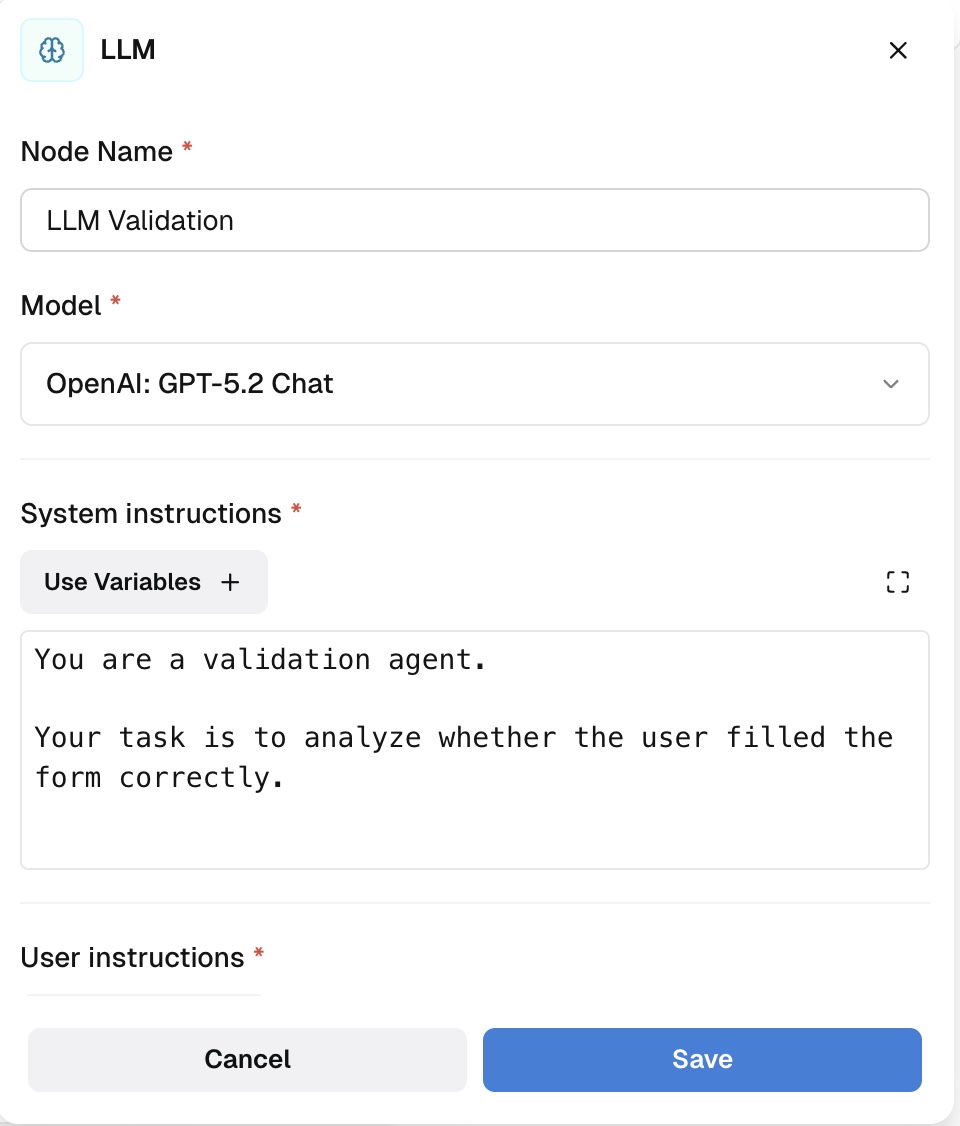
  • System instructions
    Define the role of the LLM. In this workflow, the LLM acts as a validator. Clearly describe its responsibility – for example, checking whether required fields are present and valid.
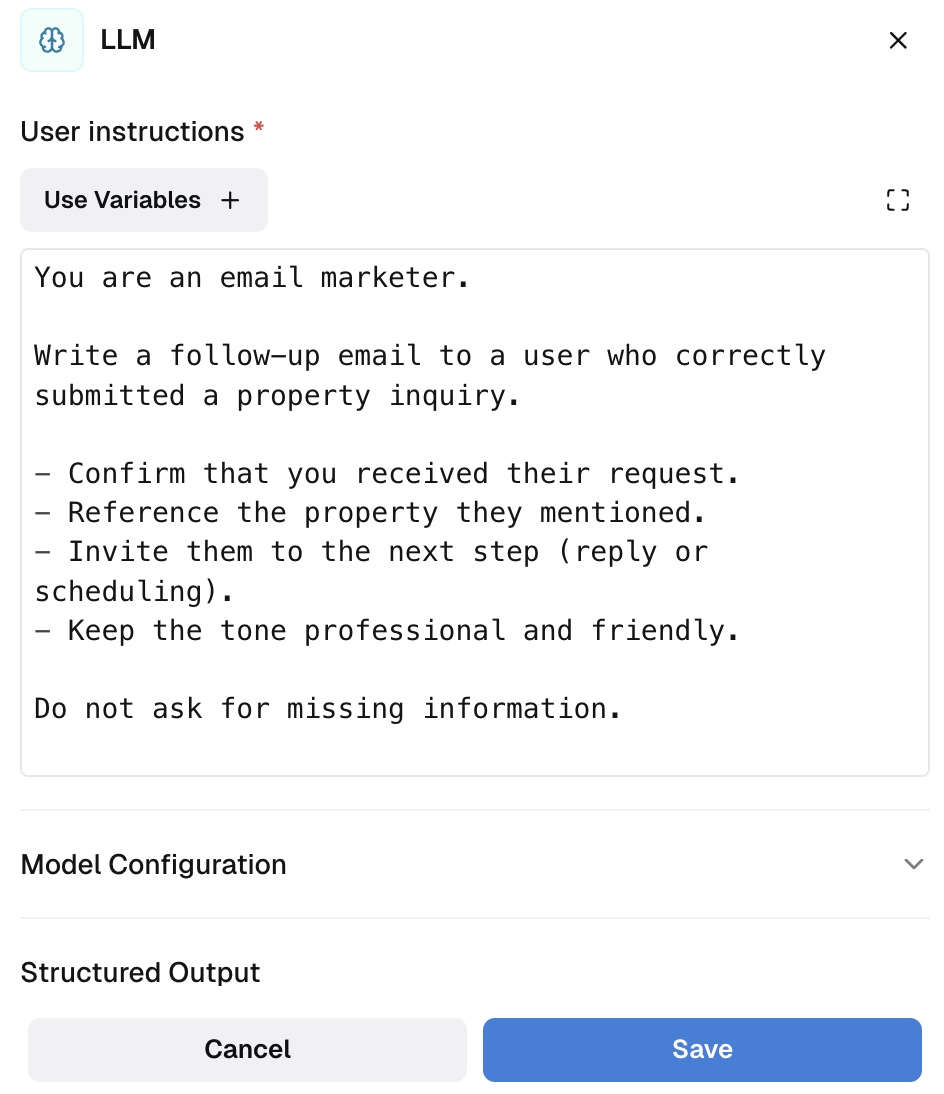
  • User instructions
    Specify exactly what the LLM should evaluate and what output it should return. Be precise and structured, but keep instructions easy to understand.

76DAC1B7 E121 464C A900 384FB21AB7ED

Important note: In the User Instructions, you must include the variables that define where the node should pull the required information from. These variables come from the previous node (the Google Sheets Form).
57A2B48B 6233 4A3D B404 D3B3FF43AE5C

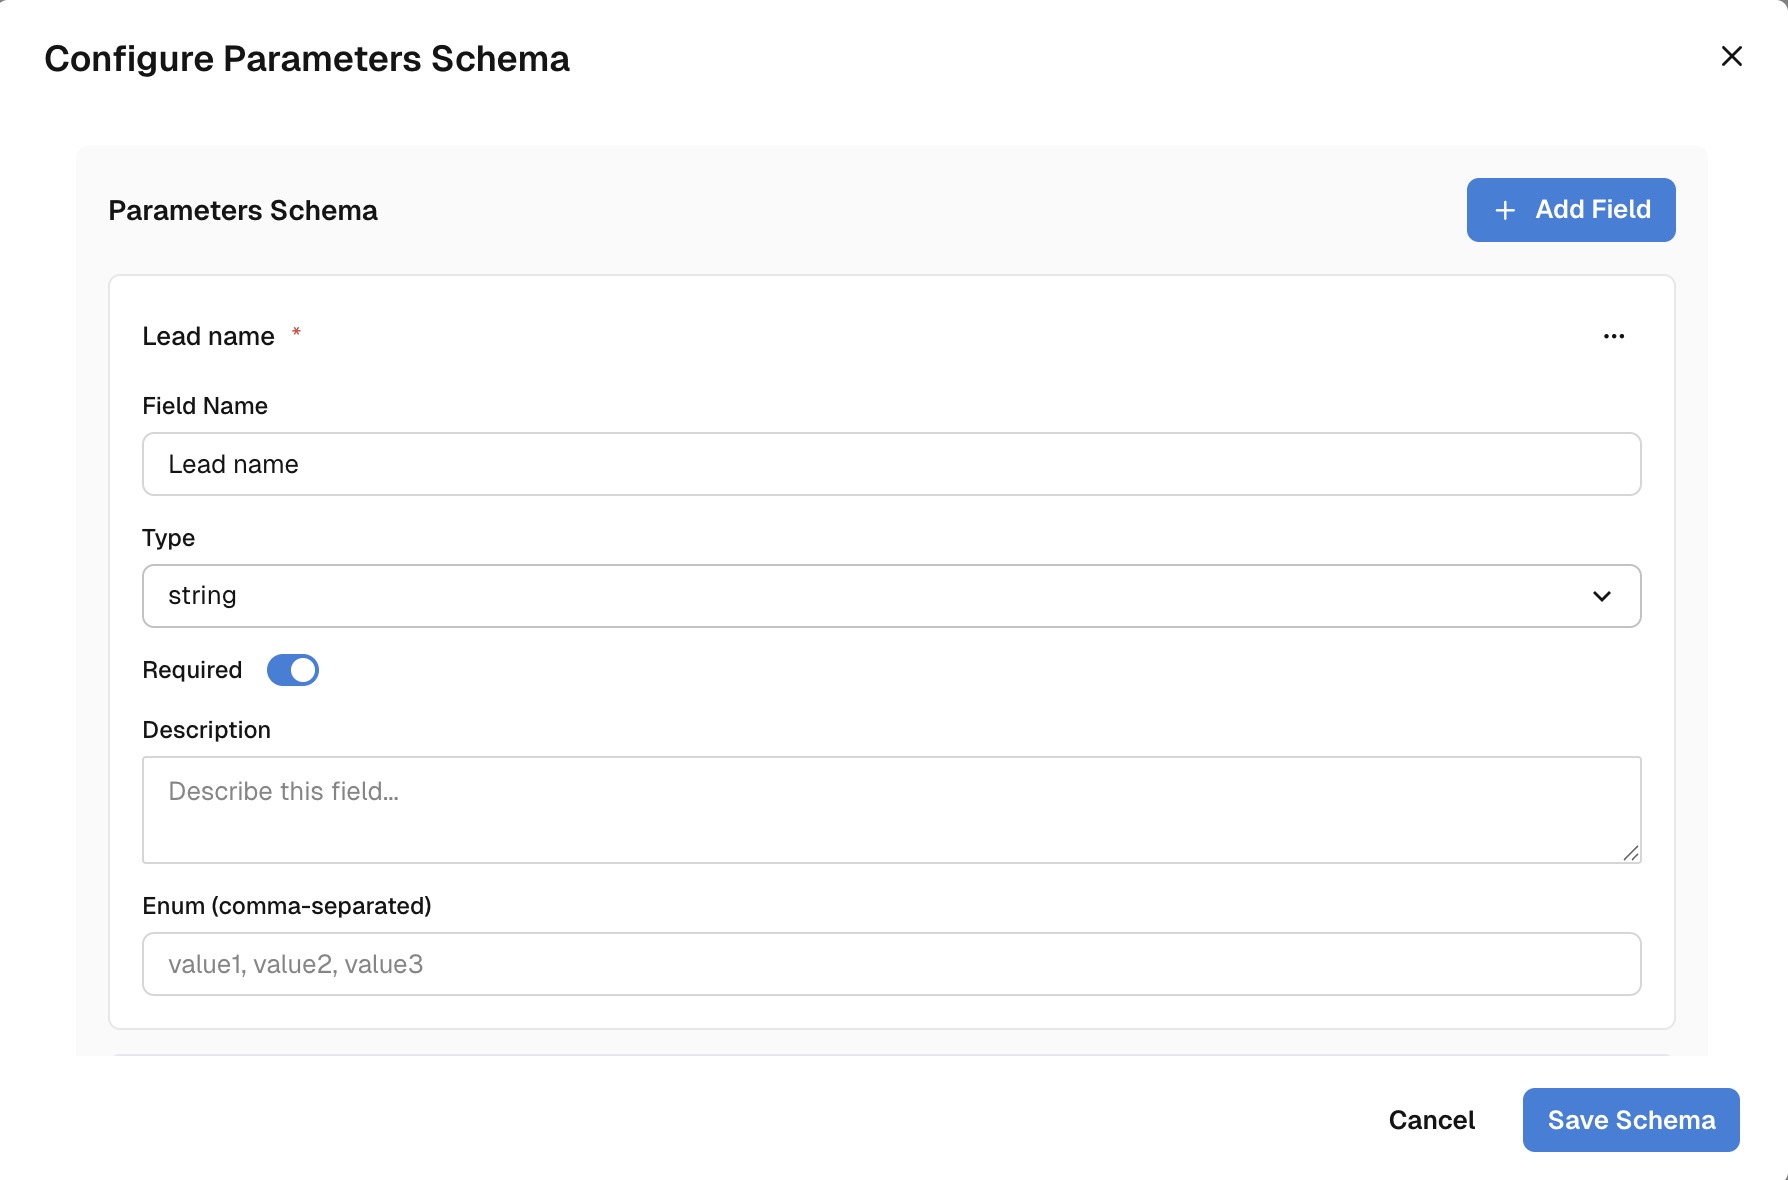
Final step: Configure the structured output. This defines how your data will be mapped. Go to the Structured Output field and add the required parameters. In this scenario, they include the lead name, email, property ID, and a separate field for the validation result.
4ABDDD7E A0E6 48DA A592 2F49F8D4C83F

Step 3: Set the Condition node — Was validation successful?

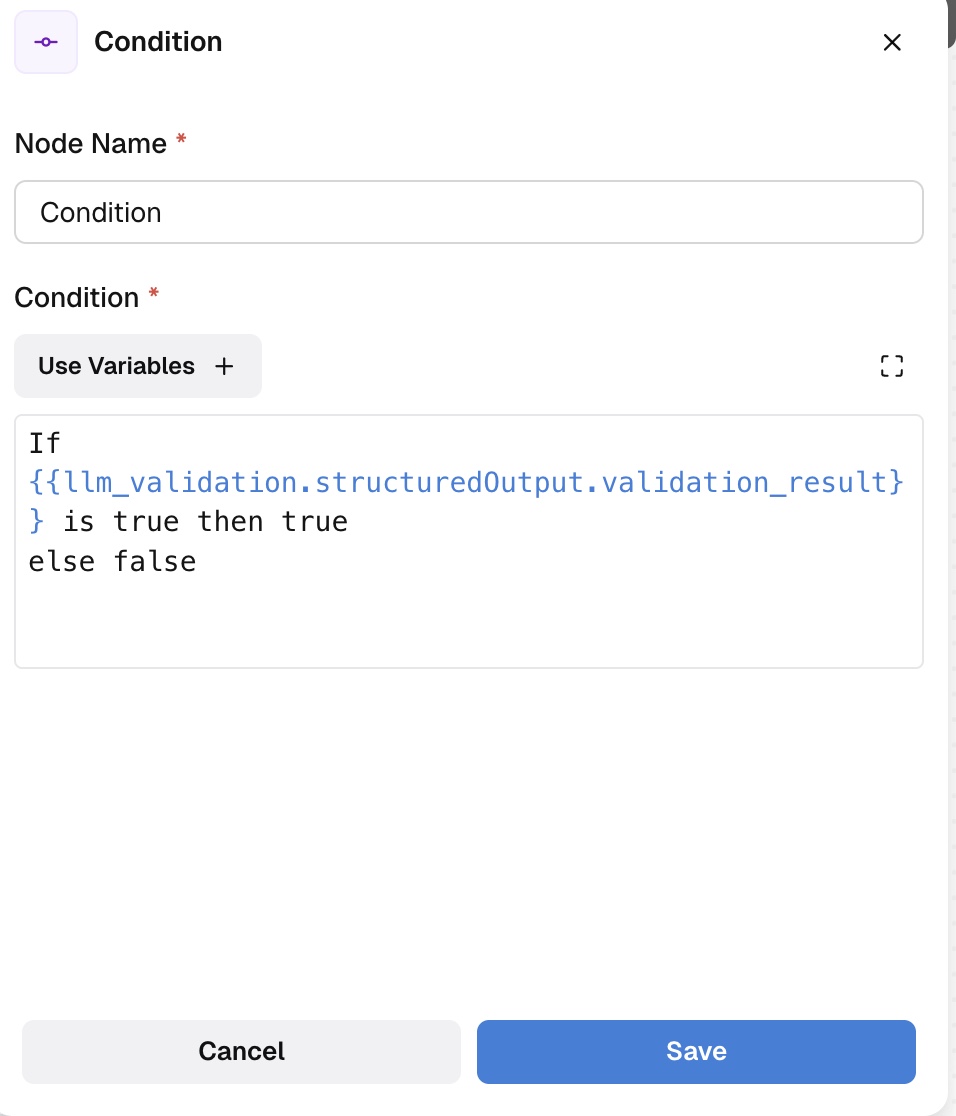
Now, add a Condition node to evaluate the output of the validation LLM.

This node determines whether the form submission meets your validation rules. Based on the result, the workflow will branch into two paths:

  • Valid submission
  • Invalid or incomplete submission

As in the previous step, make sure to specify in the Condition node which data it should evaluate.
5995E426 A400 4A9B A3CD 59E40C1636BD

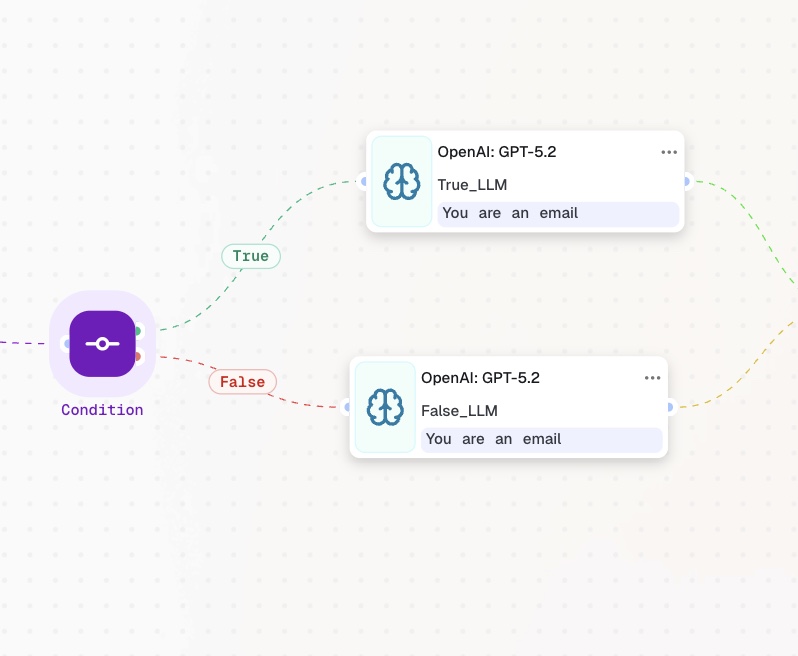
Step 4: Connect the Condition node to LLM nodes

At this stage, you will segment users based on the validation result.

Create two separate LLM nodes:

  • One for users who submitted the form correctly
  • One for users who submitted incomplete or incorrect information

Each LLM should receive clear user instructions describing:

  • Who the message is for
  • What the email should communicate
  • What action the recipient should take next

Connect each LLM node to the corresponding TRUE or FALSE branch of the Condition node.
87F02547 A680 4D2F 8C18 70324CB3C88C

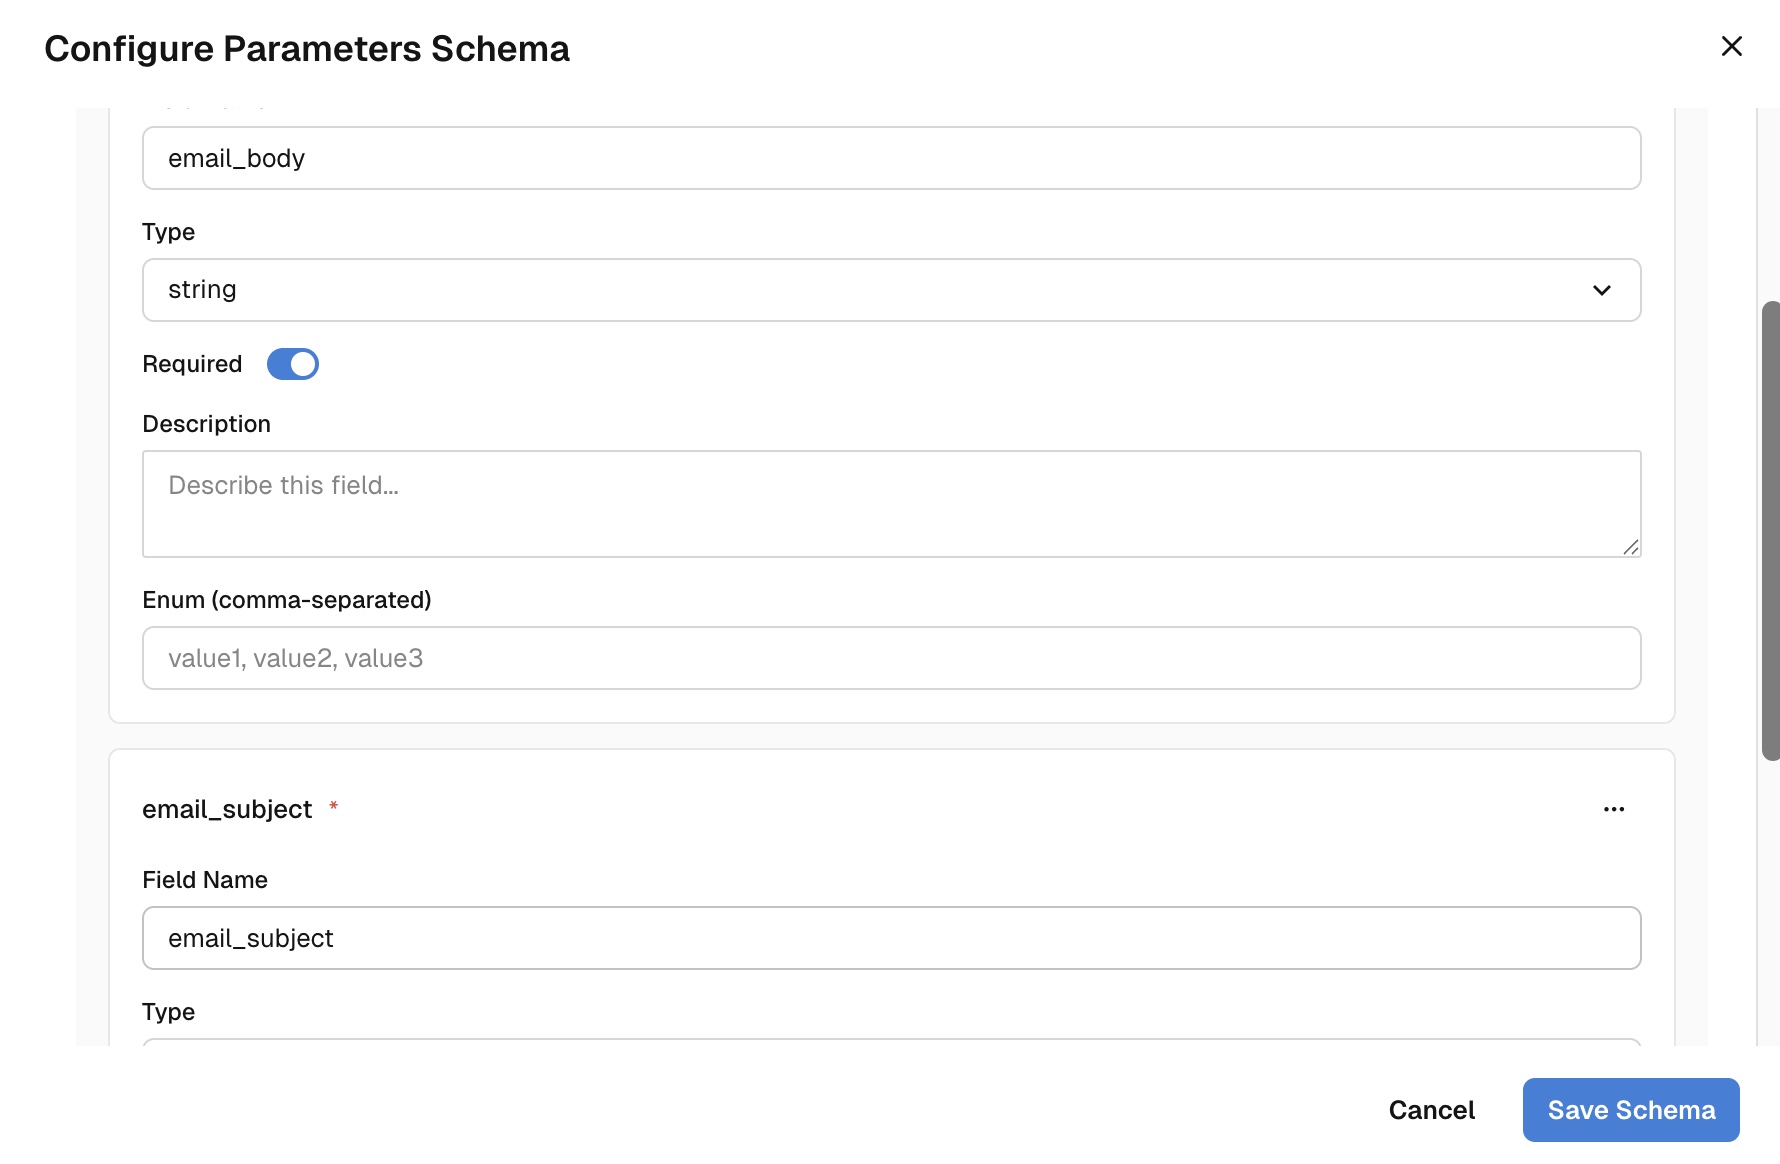
Important: Don’t forget to define how the data should be mapped. In this scenario, you should include email-specific fields such as email, email_subject, email_body, and any other required parameters.
C5701D96 ADBD 4D49 B4B1 F11EA5EDFAA3

Step 5 (Optional): Check LLM outputs before sending emails

This step is optional but recommended, especially during testing.

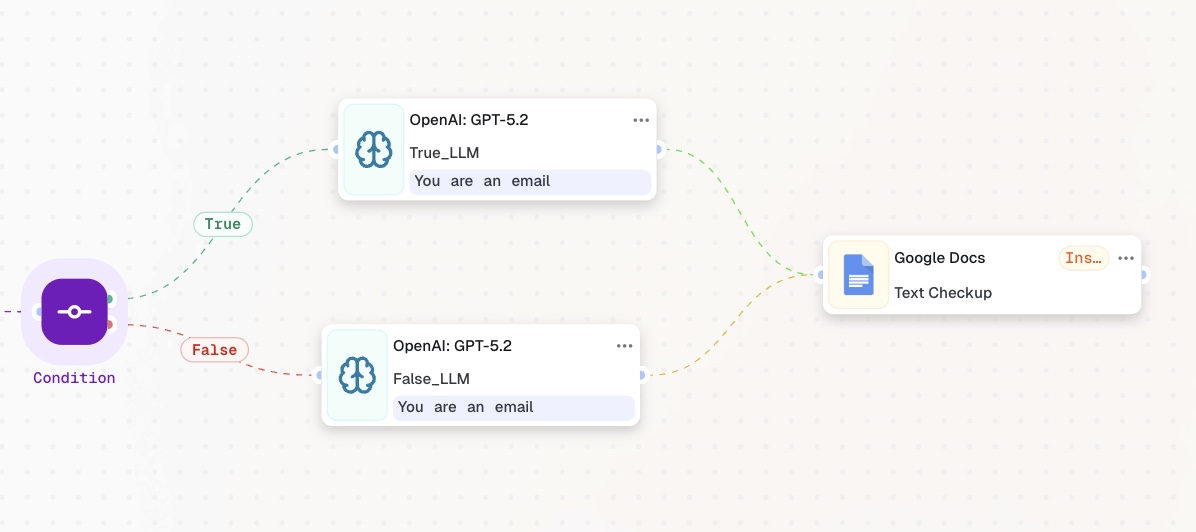
You can review the generated email content before sending it by saving the LLM output to a Google Doc. To do this, add an “Action in App” node and connect it to Google Docs.

Once you are satisfied with the output, you can disable or remove this node and proceed to the final step.
E7D48C34 0811 450E 9344 D641BA6A9713

Step 6: Send emails to both user groups

Now that the emails are generated, it’s time to send them.

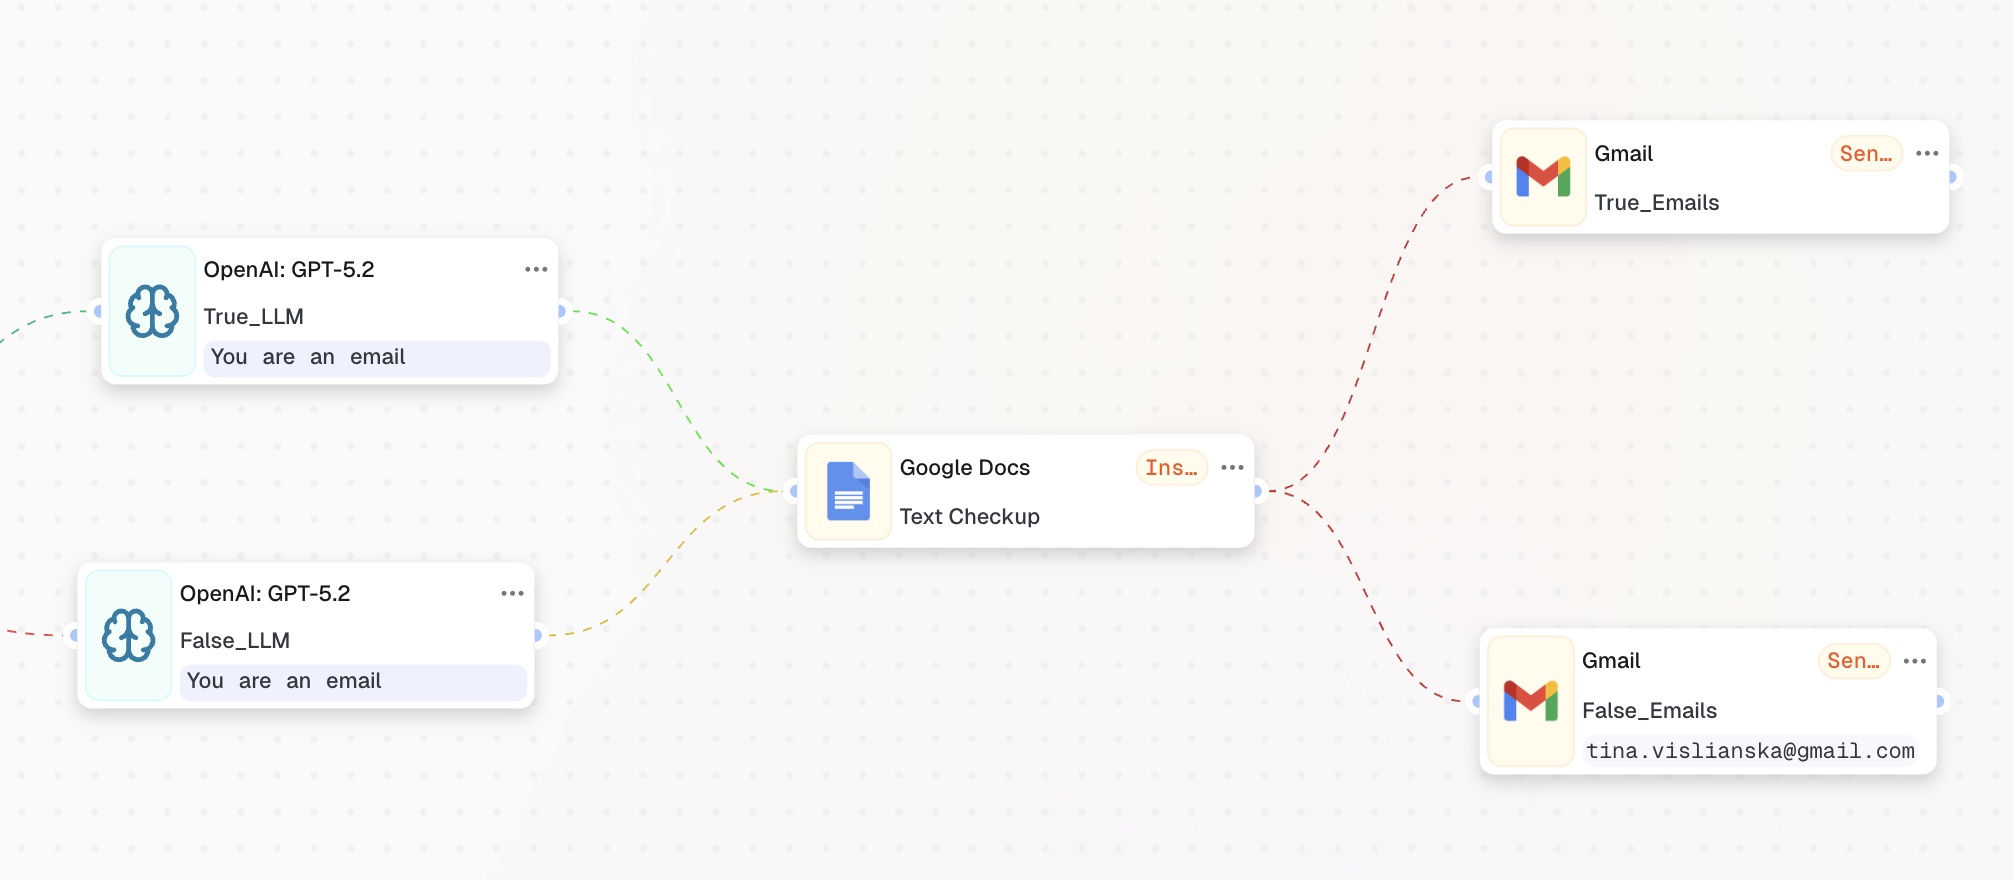
Add two “Action in App” nodes and connect each one to your Google account with the Send Email action selected. Attach each node to the corresponding LLM output.
5605392C 47A6 4023 AF55 5C356879D789

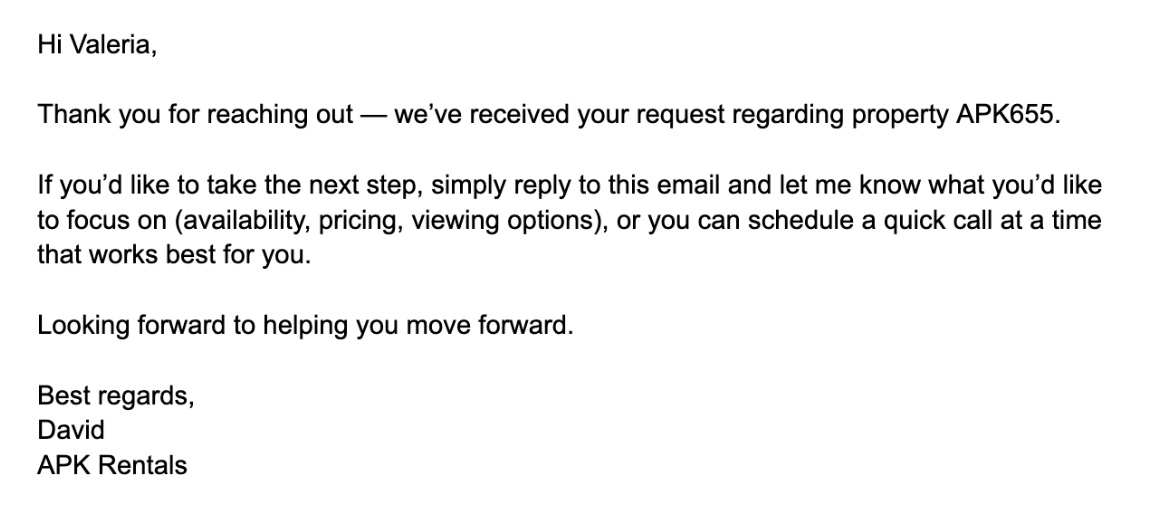
Once connected, the workflow is complete:

  • Users with valid submissions receive the full property details
  • Users with incomplete submissions receive a request for additional information

Your AI-automated Property Inquiry Auto-Response is now live.

What’s next?

You’ve now built a complete AI-automated Property Inquiry Auto-Response workflow.

Next, take it further by exploring Control Nodes to add advanced routing, retries, approvals, and monitoring to your workflows. You may also want to schedule follow-up emails after 24 or 72 hours.

Be sure to follow us on social media, enable notifications, and don’t miss upcoming guides that show how to grow your business with zero code and minimal effort – all by clicking a single “Start” button.
  • What you’ll build in this guide
  • Why Does it Matter?
  • Step 1: Set the trigger node – Event from App
  • Step 2: Set the action node – LLM (Validation)
  • Step 3: Set the Condition node — Was validation successful?
  • Step 4: Connect the Condition node to LLM nodes
  • Step 5 (Optional): Check LLM outputs before sending emails
  • Step 6: Send emails to both user groups
  • What’s next?

Other Guides

How to Build an Out-of-Office Coverage Handoff Flow in CogniAgent

date-icon Jun 26, 2026
clock-icon 4 min read

How to Set Up an Employee Onboarding Flow with Conversation Flows and Definition of Done

date-icon Jun 26, 2026
clock-icon 4 min read

How to Build a Customer Support Triage Agent in CogniAgent: From Inbound Message to Routed Ticket

date-icon Jun 26, 2026
clock-icon 5 min read
logo
  • Features
    • Platform Capabilities
      • Conversational AI
      • Multi-Agent Collaboration
      • Autonomous AI Agents
      • Business Intelligence Dashboard
      • AI Magic Window
      • AI Phone System
      • Cogni Canvas
      • Brand Customization Engine
      • Universal Data Integration
      • Emotional Intelligence Engine
      • Advanced Voice Intelligence
      • Knowledge Base Training
      • All Features
  • Technology
    • AI Concepts & Technology
      • Cognitive AI
      • Agentic Commerce
      • Advanced Voice AI
      • What is an AI Agent
      • AI Agent vs Chatbot
      • Generative AI vs Conversational AI
      • Cognitive AI vs Generative AI
      • Top LLM Agents
      • What is Agentic AI
      • How AI Agents Learn
  • Operations & Use Cases
    • Sales
      • Lead Qualification
      • Lead Enrichment on Autopilot
      • Purchase Order Processing
      • AI Sales Assistant
    • Customer Support
      • Returns Management
      • Order Status Tracking
      • Call Center Automation
      • Customer Service AI Agent
    • Marketing
      • AI Marketing Agent
      • Campaign Response Notifications
      • Content Distribution Tracking
      • Automated Reporting
    • HR & Recruiting
      • Candidate Screening
      • Onboarding Automation
      • AI Agents for HR
      • AI Recruiting Agent
    • Operations
      • Invoice Data Entry Automation
      • Automated Payment Verification
      • ERP Automation
  • Industries
    • Retail & eCommerce
      • eCommerce AI Solutions
      • Shopify
      • WooCommerce
      • Magento
      • BigCommerce
      • Fashion / Apparel
      • Electronics
      • Auto Parts
      • All eCommerce stores
    • Home Services
      • HVAC
      • Cleaning
      • Plumbing
      • Roofing
      • Auto Repair
    • Other Industries
      • Real Estate
      • Restaurants
      • Security
  • Solutions
    • Build with CogniAgent
      • AI Agent Builder
      • Virtual Employees
      • Workflow Automation
    • Compare
      • vs n8n
      • vs Make
      • vs Relevance AI
      • vs Lindy
      • vs Tidio
      • vs Rasa
      • vs Chatbase
      • vs Zapier
      • All comparisons
    • Guides & Resources
      • How-to Guides
      • Educational Guides
      • Blog
      • Tips & Tricks
      • Use Case Library
      • ROI Calculator

© 2026 Glorium Technologies LTD. All rights reserved.

Privacy Policy Terms of Service

    CogniAgent Free Trial
    We'll help you explore cognitive AI automation for your specific industry and business needs to get the most from your first experience.

      CogniAgent Demo Request
      We'll help you explore cognitive AI automation for your specific industry and business needs to get the most from your first experience.
      Get Early Access to CogniAgent
      Get 6 Months Pro Plan for Free
      Build unlimited AI agents and workflows with no restrictions. Test our Voice AI phone call automation with a 7-day trial, connect 2,700+ apps, and access premium AI models - all with unlimited users from day one.

        Joined today: 46

          Custom AI Agent Creation Pricing Request
          We're excited about the opportunity to discuss how we can help you create your custom conversational AI agent within and beyond CogniAgent capabilities according to your specific industry and functional needs.